How to Use the URL Navigator Chrome Extension
The URL Navigator is a handy Chrome extension that lets you move through a list of links easily in one browser tab. Follow this guide to learn how to set it up and use it step by step.
 URL Navigator V3 Final.zip
 1. Installation
Step 1: Get the Extension Files
- Extract all the files from zip file:
manifest.json,popup.html,popup.js,background.js, and the icons (icon16.png,icon48.png,icon128.png) are important files. - Put them all in the same folder on your computer.

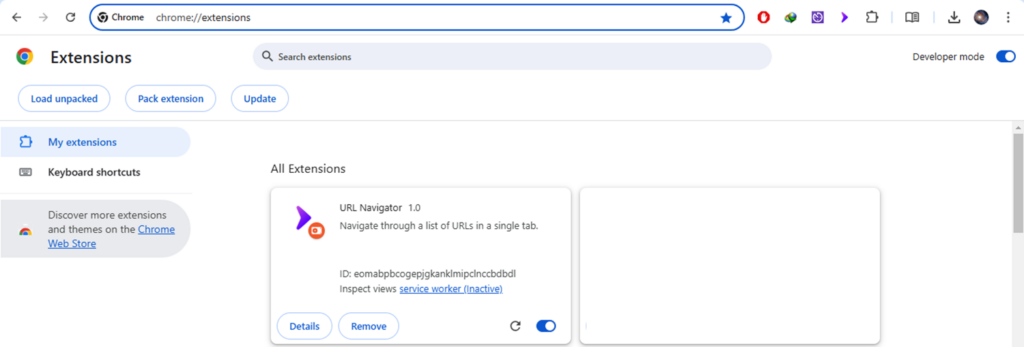
Step 2: Add the Extension to Chrome
- Open Chrome and type
chrome://extensions/into the address bar. - Turn on Developer mode (find the switch in the top-right corner).
- Click Load unpacked and choose the folder where you saved the files.
- The extension will appear in your list, with its custom icon showing.
2. Features Overview
What It Can Do:
- Start Navigation: Automatically open and move through a list of links.
- Pause, Continue, and Stop: Control when and how the navigation happens.
- Manual Navigation: Use buttons to go forward or backward through your links.
- Shortcut Keys:
- Next Link:
Ctrl+Shift+Right - Previous Link:
Ctrl+Shift+Left
- Next Link:
- Set a Timer: Adjust how long the extension waits before opening the next link.
- Shortcut Toggle: Turn shortcuts on or off as needed.
3. How to Use It
Step 1: Open the Extension
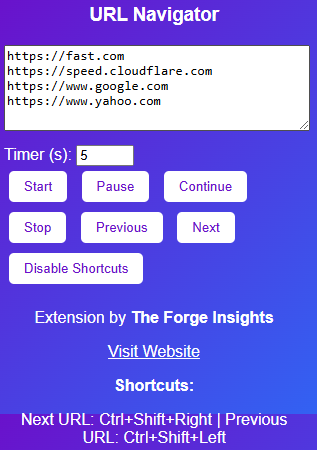
- Click the URL Navigator icon in your Chrome toolbar to open its popup menu.
Step 2: Add Your Links
- Paste your list of links into the big text box in the popup. Make sure each link is on its own line.
- Use the timer box to set how many seconds to wait between each link.
Example URL’s:
https://fast.com
https://speed.cloudflare.com
https://www.google.com
https://www.yahoo.com
Step 3: Start Browsing
- Press Start to begin. The first link will open in the tab you’re using.
Step 4: Control the Browsing
- Pause: Stop the navigation temporarily by clicking Pause.
- Continue: Resume navigation after pausing by clicking Continue.
- Stop: End the session by clicking Stop.
- Previous/Next: Use these buttons to manually move to the previous or next link.
Step 5: Use Shortcut Keys
- Quickly switch links using these keys:
- Next Link:
Ctrl+Shift+Right - Previous Link:
Ctrl+Shift+Left
- Next Link:
Step 6: Toggle Shortcuts
- Click the Toggle Shortcuts button to enable or disable shortcut functionality:
- When disabled, shortcuts won’t work even if the popup is open.
- When enabled, shortcuts work anywhere in Chrome.
4. Tips and Tricks
- Double-check that your links start with
http://orhttps://. - Use the timer to match the speed you need.
- The extension will always open links in the same tab where you started.
5. Fixing Common Problems
Problem 1: Buttons Don’t Work
- Reload the extension by going to
chrome://extensions/and reloading it. - Make sure the files are all in the right folder.
Problem 2: Shortcut Keys Don’t Work
- Check if shortcuts are enabled by clicking the Toggle Shortcuts button.
- Remember the new shortcuts:
Ctrl+Shift+RightandCtrl+Shift+Left.
Problem 3: Links Open in a New Tab
- This extension is designed to keep links in the same tab. If they open in a new one, reload the extension and try again.
6. Credits and Support
The URL Navigator extension was made by The Forge Insights to help anyone who deals with multiple links. For questions or feedback, visit The Forge Insights Website.
Any further updates are posted here
Happy browsing with URL Navigator!
Image/icon used inthis project is from Next icons created by Jesus Chavarria – Flaticon